• Skip to primary navigation
  • Skip to main content
  • Skip to primary sidebar
The Virtuous Home logo
  • About
    • About
    • Privacy Policy and Disclosure
    • Contact
  • Homemaking
    • Homemaking Lifestyle
    • Handmade
  • Sourdough
  • Fresh Milled Flour
  • Recipes
  • Resources
    • The Homemaker’s Library
    • Shop
    • Amazon Favorites
    • Free Resource Library
    • Healthy Living
      • Pro Metabolic
  • Home

Posts

Tuna Salad

Mar 13, 2026 · Leave a Comment

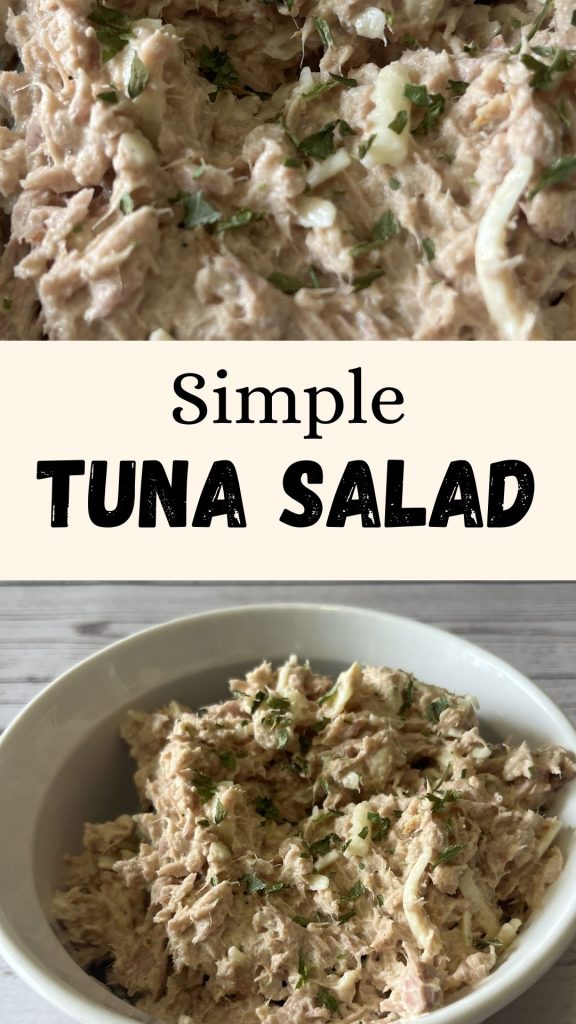
Sometimes the simplest meals are the most satisfying, and this easy tuna salad is a perfect example. Made with pantry staples and just a few minutes of prep, it’s creamy, flavorful, and wonderfully versatile. A splash of lemon brightens the flavor while a little grated cucumber or cheddar adds just the right bit of texture.

Whether tucked into a sandwich, served with crackers, or piled onto toast, this classic tuna salad makes a quick and comforting meal.

Ingredients

  • 1 (5 oz) can tuna, drained well
  • ¼ cup mayonnaise
  • A splash of lemon juice
  • 1 tablespoon grated cucumber or shredded cheddar cheese
  • Salt, to taste
  • Black pepper, to taste

How to make Tuna Salad

Open the can of tuna and drain it well. Add the tuna to a medium bowl and break it apart with a fork.

Add the mayonnaise, a splash of lemon juice, and either the grated cucumber or shredded cheddar cheese for a little texture. Stir everything together until well combined.

Season with salt and black pepper to taste and mix again.

Serve the tuna salad between two slices of sourdough bread or focaccia for a sandwich, with homemade crackers on the side, or spooned onto open-faced toast.

Save it for later…

Recipes

Sourdough Pretzel Buns

Mar 11, 2026 · Leave a Comment

Sourdough pretzel buns are soft, chewy, and full of rich flavor with that classic pretzel-style crust. The sourdough starter adds depth and a subtle tang that makes these buns especially delicious for sandwiches or burgers. With their golden brown exterior and tender interior, they are a wonderful homemade alternative to store-bought buns.

These buns are perfect for serving with grilled meats, deli sandwiches, or even alongside soups and salads. Once you try homemade sourdough pretzel buns, they may quickly become a favorite in your kitchen.

Ingredients:

  • 1/2 cup sourdough starter (100g)
  • 1 cup water (230g)
  • 1 tablespoon sugar or honey
  • 1 teaspoon salt
  • 3 1/2 cups flour (450g)

Baking Soda Bath:

  • 4 cups water
  • 1/4 cup baking soda

How to make Sourdough Pretzel Buns

In a large mixing bowl, combine the sourdough starter, water, sugar, salt, and flour. Knead the dough for about 20 minutes until it becomes smooth and elastic. You can knead by hand or use a stand mixer with a dough hook.

Place the dough in a lightly greased bowl and cover. Allow it to rise at room temperature for about 8–12 hours, or until doubled in size.

Once the dough has risen, turn it out onto a lightly floured surface. Divide the dough into 8 equal pieces.

Shape each piece into a smooth ball by pulling the edges of the dough toward the bottom and gently rolling it on the counter to create surface tension.

Place the shaped buns on a parchment-lined baking sheet and cover lightly. Let them rest for about 30–45 minutes.

Pretzel Bath

Preheat the oven to 425°F.

Boil 4 cups of water in a kettle and pour into a large bowl. Add the baking soda and stir until its dissolved.

Carefully place each dough ball into the boiling water for about 30 seconds, flip it and leave it in for 30 more seconds, then remove it with a slotted spoon and return it to the baking sheet.

Once all the buns have been bathed, use a sharp knife or bread lame to cut a small X or single slash on the top of each bun. Sprinkle with coarse salt if desired.

Baking the Pretzel Buns

Bake the buns for 18–22 minutes, or until they are deep golden brown.

Remove from the oven and allow the buns to cool on a wire rack before serving.

Serving Ideas

Sourdough pretzel buns are excellent for burgers, pulled pork sandwiches, deli meats, or grilled chicken. They also make a delicious side for hearty soups and stews.

You can slice them and toast lightly with butter, or use them as a base for breakfast sandwiches.

Tips for Success

Make sure the dough is smooth and elastic before the first rise. Proper kneading helps develop the structure needed for soft, fluffy buns.

Do not skip the baking soda bath, as it gives pretzel buns their signature chewy crust and deep golden color.

Allow the buns to cool slightly before slicing so the interior texture can set properly.

Save it for later…

Sourdough

Sourdough Cinnamon Raisin Scones

Mar 11, 2026 · Leave a Comment

Sourdough Cinnamon Raisin Scones are a cozy and flavorful way to use your sourdough starter while baking a classic homemade treat. These scones are tender and lightly sweet, filled with warm cinnamon and plump raisins that make them perfect for breakfast or an afternoon snack. The sourdough starter adds a subtle tang and depth of flavor, creating a soft, bakery-style scone that pairs beautifully with a cup of coffee or tea.

Ingredients:

  • 4 1/3c – 500g flour
  • 1 1/3c – 300g water
  • 1t salt
  • 1/2c sugar
  • 3T cinnamon
  • 1c raisins

How to make Sourdough Cinnamon Raisin Scones

Add everything to a bowl and knead with a stand mixer for 20 minutes.

Cover and let the dough rest until it’s risen twice its size. If you are baking in the cooler months (below 65 degrees), recreate a warm environment by placing the dough into the oven with the light turned on or on the stovetop if you are baking. This dough will not rise so after 6-8 hours, it will be ready to shape.

After 6-8 hours of resting, preheat the oven to 375 and line a baking sheet with parchment paper.

Turn the dough onto a floured surface and roll or pat out until the dough is about 1 inch thick. Using a round cookie cutter or an upside down glass, cut out the rounds. Repeat the process as needed until all the dough has been cut into rounds (You can also cut it into pizza slices or squares). Place the dough on the lined baking sheet and put it into the oven.

Bake for 30 minutes or until the top and sides are a firm and light brown.

Cool on a wire rack for at least 10 minutes before slicing.

Serve with butter.

Save it for later…

Sourdough

Sourdough Garlic Knots

Mar 11, 2026 · Leave a Comment

Sourdough Garlic Knots are a delicious way to turn your homemade sourdough dough into soft, buttery, and flavorful bites. Perfect as a side for pasta, soups, or just as a snack, these knots are brushed with garlic butter and baked until golden brown. Using sourdough adds a subtle tang and extra depth of flavor, making these garlic knots tender, pillowy, and utterly irresistible.

Ingredients:

  • 4 1/2c – 550g flour 
  • 1 1/3c – 300g water
  • 1t salt
  • 1T sugar
  • 2T olive oil or butter

How to make Sourdough Garlic Knots

Add everything to a bowl and knead with a stand mixer for 20 minutes.

Cover and let the dough rest until it’s risen twice its size. If you are baking in the cooler months (below 65 degrees), recreate a warm environment by placing the dough into the oven with the light turned on or on the stovetop if you are baking.

Once the dough has risen, turn out the dough onto a floured surface and divide it into 8 equal parts.

Shape each piece of dough by rolling it under your palms until it’s about a foot long.

Tie it into a loose knot by looping the dough over itself and tucking the ends under and through the center. Tuck the other end underneath the knot. Make sure not to pull the knot too tight, or it will tighten further while baking and lose its soft, fluffy texture. Place each knot on a baking sheet, leaving a little space between them to allow for expansion, and brush with garlic butter or olive oil before baking for extra flavor.

Bake at 425 for 15 minutes.

Cool for 15 minutes before serving.

Save it for later…

Sourdough

Sourdough Discard Crackers

Mar 11, 2026 · Leave a Comment

Sourdough Discard Crackers are a simple and delicious way to use up leftover sourdough starter. Crispy, flavorful, and easy to make, these crackers can be customized with herbs, seeds, or spices for a snack that’s perfect on its own or paired with cheese and dips. Using sourdough discard not only reduces waste but also adds a subtle tang and depth of flavor that makes these crackers irresistible.

Ingredients:

  • 2c sourdough starter
  • 1/2t salt
  • 1T parsley
  • oil, for drizzling

How to make Sourdough Discard Crackers

Preheat the oven to 425. If you are using a cast iron baking dish, make sure to preheat it as well.

Drizzle the oil all over the bottom of your baking dish and dump the sourdough starter in. Spread it around as thin as possible with a spatula.

Drizzle some more oil on top and season with salt and parsley.

Bake for 10 minutes.

Remove the baking dish from the oven and flip the cracker dough. Cut it into squares and season again.

Bake for another 10 minutes or until crackers are lightly toasted and crunchy.

Remove from the oven and cool for 5 minutes before serving.

Save it for later…

Sourdough

Sourdough Discard Banana Bread with Streusel

Mar 11, 2026 · Leave a Comment

If you keep a sourdough starter, you likely find yourself with extra discard during regular feedings. One of the best ways to use it is in baked goods like banana bread. This sourdough discard banana bread is moist, tender, and full of rich banana flavor while making good use of leftover starter.

The sourdough discard adds a subtle depth of flavor and helps create a soft texture without making the bread taste sour. It’s a simple recipe that works well for breakfast, snacks, or even dessert.

Sourdough Discard Banana Bread

Sourdough Discard Banana Bread

One of the best ways to use sourdough discard is in baked goods like banana bread. This sourdough discard banana bread is moist, tender, and full of rich banana flavor while making good use of leftover starter.

Prep Time 8 hours
Cook Time 1 hour
Additional Time 1 hour
Total Time 10 hours

Ingredients

  • 3 bananas, mashed
  • ⅓ cup sourdough starter discard (100 g)
  • 3 eggs
  • ½ cup oil or melted butter (108 g)
  • 1 cup sugar (200 g)
  • 2 cups flour (245 g)
  • ¼ teaspoon salt
  • 2 teaspoon baking powder

Instructions

    Mash the bananas in a large mixing bowl.

    Add all the ingredients except baking powder and baking soda. Stir until everything is incorporated.

    Cover and ferment for 6-8 hours or overnight in the cooler months.

    When you are ready to bake, preheat the oven to 350 and line a loaf pan with parchment paper. I like to wet the parchment paper to help it fit in the pan better.

    Add the baking powder and baking soda and stir until incorporated.

    Pour the batter into the prepared loaf pan and spread it evenly.

    Bake for about 60 minutes, or until a toothpick inserted into the center comes out clean.

    Cool on a wire rack before serving.

Did you make this recipe?

Please leave a comment on the blog or share a photo on Pinterest

© Naomi Scott

Why You’ll Love This Sourdough Discard Banana Bread

This recipe is a great way to reduce food waste while baking something delicious. The sourdough discard blends beautifully with the bananas and creates a slightly richer flavor than traditional banana bread.

It’s also an easy, one-bowl style recipe that doesn’t require any special equipment. If you have overripe bananas and extra sourdough starter, you can quickly turn them into a comforting homemade treat.

Ingredients

  • 2 cups flour (245 g)
  • ⅓ cup sourdough starter discard (100 g)
  • ¼ teaspoon salt
  • 3 eggs
  • ½ cup oil or melted butter (108 g)
  • 1 cup sugar (200 g)
  • 1 teaspoon baking powder
  • ½ teaspoon baking soda

Streusel Ingredients

  • 1/4c flour
  • 1/4c sugar
  • pinch of salt
  • 2t cinnamon

How to Make Sourdough Discard Banana Bread

Mash the bananas in a large mixing bowl.

Add all the ingredients except baking powder and baking soda and streusel ingredients. Stir until everything is incorporated.

Cover and ferment for 6-8 hours or overnight in the cooler months.

When you are ready to bake, preheat the oven to 350 and line a loaf pan with parchment paper. I like to wet the parchment paper to help it fit in the pan better.

Add the baking powder and baking soda and stir until incorporated.

Pour the batter into the prepared loaf pan and spread it evenly.

Mix the streusel topping together and sprinkle over the banana bread batter.

Bake for about 60 minutes, or until a toothpick inserted into the center comes out clean.

Cool on a wire rack before serving.

Tips for the Best Banana Bread

Use very ripe bananas for the best flavor and sweetness. The darker the bananas, the better the banana bread will taste.

Do not overmix the batter. Stir just until the ingredients are combined to keep the bread tender.

Add a streusel topping to take it to the next level.

Optional Add-Ins

You can easily customize this banana bread with a few extra ingredients if desired.

Some popular additions include chopped walnuts, chocolate chips, or a sprinkle of cinnamon. These small additions can add texture and extra flavor to the loaf.

Serving Ideas

Sourdough discard banana bread is delicious served warm with a little butter. It also pairs well with coffee or tea for a simple breakfast or afternoon snack.

Slices can be toasted lightly and spread with butter, honey, or cream cheese for an extra treat.

Final Thoughts

This sourdough discard banana bread is a wonderful way to use leftover starter while baking something comforting and delicious. With simple ingredients and a straightforward method, it’s an easy recipe to add to your regular baking rotation.

If you keep a sourdough starter in your k

Sourdough

Sourdough Discard Banana Bread

Mar 11, 2026 · Leave a Comment

If you keep a sourdough starter, you likely find yourself with extra discard during regular feedings. One of the best ways to use it is in baked goods like banana bread. This sourdough discard banana bread is moist, tender, and full of rich banana flavor while making good use of leftover starter.

The sourdough discard adds a subtle depth of flavor and helps create a soft texture without making the bread taste sour. It’s a simple recipe that works well for breakfast, snacks, or even dessert.

Sourdough Discard Banana Bread

Sourdough Discard Banana Bread

One of the best ways to use sourdough discard is in baked goods like banana bread. This sourdough discard banana bread is moist, tender, and full of rich banana flavor while making good use of leftover starter.

Prep Time 8 hours
Cook Time 1 hour
Additional Time 1 hour
Total Time 10 hours

Ingredients

  • 3 bananas, mashed
  • ⅓ cup sourdough starter discard (100 g)
  • 3 eggs
  • ½ cup oil or melted butter (108 g)
  • 1 cup sugar (200 g)
  • 2 cups flour (245 g)
  • ¼ teaspoon salt
  • 2 teaspoon baking powder

Instructions

    Mash the bananas in a large mixing bowl.

    Add all the ingredients except baking powder and baking soda. Stir until everything is incorporated.

    Cover and ferment for 6-8 hours or overnight in the cooler months.

    When you are ready to bake, preheat the oven to 350 and line a loaf pan with parchment paper. I like to wet the parchment paper to help it fit in the pan better.

    Add the baking powder and baking soda and stir until incorporated.

    Pour the batter into the prepared loaf pan and spread it evenly.

    Bake for about 60 minutes, or until a toothpick inserted into the center comes out clean.

    Cool on a wire rack before serving.

Did you make this recipe?

Please leave a comment on the blog or share a photo on Pinterest

© Naomi Scott

Why You’ll Love This Sourdough Discard Banana Bread

This recipe is a great way to reduce food waste while baking something delicious. The sourdough discard blends beautifully with the bananas and creates a slightly richer flavor than traditional banana bread.

It’s also an easy, one-bowl style recipe that doesn’t require any special equipment. If you have overripe bananas and extra sourdough starter, you can quickly turn them into a comforting homemade treat.

Ingredients

  • 2 cups flour (245 g)
  • ⅓ cup sourdough starter discard (100 g)
  • ¼ teaspoon salt
  • 3 eggs
  • 3 bananas, mashed
  • ½ cup oil or melted butter (108 g)
  • 1 cup sugar (200 g)
  • 1 teaspoon baking powder
  • ½ teaspoon baking soda

How to Make Sourdough Discard Banana Bread

Mash the bananas in a large mixing bowl.

Add all the ingredients except baking powder and baking soda and streusel ingredients. Stir until everything is incorporated.

Cover and ferment for 6-8 hours or overnight in the cooler months.

When you are ready to bake, preheat the oven to 350 and line a loaf pan with parchment paper. I like to wet the parchment paper to help it fit in the pan better.

Add the baking powder and baking soda and stir until incorporated.

Pour the batter into the prepared loaf pan and spread it evenly.

Bake for about 60 minutes, or until a toothpick inserted into the center comes out clean.

Cool on a wire rack before serving.

Tips for the Best Banana Bread

Use very ripe bananas for the best flavor and sweetness. The darker the bananas, the better the banana bread will taste.

Do not overmix the batter. Stir just until the ingredients are combined to keep the bread tender.

Add a streusel topping to take it to the next level.

Related Post: Sourdough Discard Banana Bread with Streusel

Optional Add-Ins

You can easily customize this banana bread with a few extra ingredients if desired.

Some popular additions include chopped walnuts, chocolate chips, or a sprinkle of cinnamon. These small additions can add texture and extra flavor to the loaf.

Serving Ideas

Sourdough discard banana bread is delicious served warm with a little butter. It also pairs well with coffee or tea for a simple breakfast or afternoon snack.

Slices can be toasted lightly and spread with butter, honey, or cream cheese for an extra treat.

Final Thoughts

This sourdough discard banana bread is a wonderful way to use leftover starter while baking something comforting and delicious. With simple ingredients and a straightforward method, it’s an easy recipe to add to your regular baking rotation.

If you keep a sourdough starter in your kitchen, this banana bread is a practical and satisfying way to make sure none of that valuable discard goes to waste.

Save it for later…

Sourdough

Sourdough Lemon Loaf

Mar 11, 2026 · Leave a Comment

This sourdough lemon loaf is a bright, tender quick bread that makes wonderful use of sourdough starter while delivering fresh citrus flavor. The batter is mixed ahead of time and allowed to ferment, which deepens the flavor and gives the loaf a soft texture.

Finished with a simple lemon glaze, this loaf has the perfect balance of sweetness and tangy citrus. It works beautifully for breakfast, an afternoon treat with tea, or a simple homemade dessert.

Sourdough Lemon Loaf

Sourdough Lemon Loaf

This sourdough lemon loaf is a simple and flavorful way to use sourdough starter while creating a bright homemade treat. The gentle long fermentation helps develop flavor and can make the loaf easier to digest.

Prep Time 8 hours
Cook Time 1 hour
Additional Time 1 hour
Total Time 10 hours

Ingredients

  • 2 cups flour (245 g)
  • ⅓ cup sourdough starter (100 g)
  • ¼ teaspoon salt
  • 3 eggs
  • ½ cup oil or melted butter (108 g)
  • 1 cup sugar (200 g)
  • Juice of 1 lemon
  • 2 teaspoons baking powder

Instructions

    Add the flour, sourdough starter, salt, eggs, oil or melted butter, sugar, and freshly squeezed lemon juice to a large mixing bowl.
    Mix just until everything is incorporated and a smooth batter forms.
    Cover the bowl and allow the batter to ferment at room temperature for 6 to 8 hours.
    When you are ready to bake, preheat the oven to 350°F and line a loaf pan with parchment paper. Wetting the parchment paper slightly can help it fit the pan more easily.
    Add the baking powder to the fermented batter and stir until it is fully incorporated.
    Pour the batter into the prepared loaf pan and spread it evenly.
    Bake for about 60 minutes, or until a toothpick inserted into the center comes out clean.
    Allow the loaf to cool in the pan briefly, then transfer it to a wire rack to cool completely.

    Mix together a simple lemon glaze with lemon juice and enough powdered sugar to thicken it. Drizzle it on the loaf once it has cooled and serve.

Did you make this recipe?

Please leave a comment on the blog or share a photo on Pinterest

© Naomi Scott

Why You’ll Love This Sourdough Lemon Loaf

This recipe is a great way to use sourdough discard while creating a light and flavorful baked good. The long fermentation helps develop flavor and can make the loaf easier to digest.

The fresh lemon juice adds brightness, while the glaze on top gives the bread a sweet citrus finish that makes each slice extra special.

Ingredients

  • 2 cups flour (245 g)
  • ⅓ cup sourdough starter (100 g)
  • ¼ teaspoon salt
  • 3 eggs
  • ½ cup oil or melted butter (108 g)
  • 1 cup sugar (200 g)
  • Juice of 1 lemon
  • 2 teaspoons baking powder

For the lemon glaze

  • Juice of 1 lemon
  • Powdered sugar

How to Make Sourdough Lemon Loaf

Add the flour, sourdough starter, salt, eggs, oil or melted butter, sugar, and freshly squeezed lemon juice to a large mixing bowl.

Mix just until everything is incorporated and the batter is smooth.

Cover the bowl and allow the batter to ferment at room temperature for 6 to 8 hours.

When you are ready to bake, preheat the oven to 350°F and line a loaf pan with parchment paper. Wetting the parchment paper slightly can help it fit the pan more easily.

Add the baking powder to the fermented batter and stir until it is fully incorporated.

Pour the batter into the prepared loaf pan and spread it evenly.

Bake for about 60 minutes, or until a toothpick inserted into the center comes out clean.

Allow the loaf to cool in the pan briefly, then transfer it to a wire rack to cool completely.

How to Make the Lemon Glaze

Once the loaf has cooled, prepare a simple glaze by mixing the juice from another freshly squeezed lemon with enough powdered sugar to create a thick but pourable consistency.

Drizzle the glaze over the cooled lemon loaf and allow it to set before slicing.

Tips for the Best Lemon Loaf

Use freshly squeezed lemon juice for the best flavor. Fresh citrus gives the loaf a brighter and more natural taste than bottled juice.

Do not overmix the batter when adding the baking powder. Stir just until it is incorporated so the loaf stays light and tender.

Allow the loaf to cool completely before adding the glaze so it stays on top rather than soaking into the bread.

Serving Suggestions

This sourdough lemon loaf is delicious served at room temperature. It pairs well with coffee, tea, or even a light breakfast alongside some yogurt.

The loaf also keeps well for several days, making it a great recipe to bake ahead for snacks or gatherings.

Final Thoughts

This sourdough lemon loaf is a simple and flavorful way to use sourdough starter while creating a bright homemade treat. The gentle fermentation adds depth of flavor, and the sweet lemon glaze gives the loaf a refreshing finish.

Once you try this recipe, it may become a favorite way to turn sourdough discard into a delicious and satisfying baked good.

Save it for later…

Sourdough

Blueberry Lemon Sourdough Bread

Mar 11, 2026 · Leave a Comment

Blueberry Lemon Sourdough Bread is a bright and flavorful twist on traditional sourdough. Bursting with fresh or frozen blueberries and brightened with zesty lemon, this bread is both tangy and sweet, perfect for breakfast, brunch, or a cozy afternoon snack. The sourdough starter adds a subtle depth of flavor and a soft, tender crumb that pairs beautifully with the fruity, citrusy notes.

Ingredients:

  • 4 1/3c – 500g flour
  • 1 1/3c – 300g water
  • 1t salt
  • 2T lemon juice – 1 freshly squeezed lemon
  • 2T sugar
  • 1 1/2c blueberries, fresh

How to make Blueberry Lemon Sourdough Bread

Add everything but the blueberries to a bowl and knead with a stand mixer for 20 minutes.

Cover and let the dough rest until it’s risen twice its size. 

If using frozen blueberries, thaw them while you wait for the bread to rise.

Once the dough has risen, add the blueberries and shape. Place it into a lined banneton or bowl and cover with plastic wrap. Let it rise for a few more hours until doubled again. 

Preheat a small skillet and oven to 375. A medium size casserole dish would also work.

Turn out the dough onto a piece of parchment paper. Score to prevent random bursting, place the parchment paper and dough into the skillet.

Bake for 45 minutes

Cool on a wire rack for at least 30 minutes if not 1 hour before slicing. Serve with butter

Save it for later…

Sourdough

Sourdough Carrot Cake Loaf

Mar 11, 2026 · Leave a Comment

If you love baking with sourdough, this sourdough carrot cake loaf is a delicious way to put your starter to work. Moist and flavorful, this loaf combines tender shredded carrots, warm cinnamon, and a touch of nutmeg with the subtle tang of sourdough. It’s perfect for breakfast, an afternoon snack, or a simple dessert, and it’s easy to make with ingredients you likely have on hand.

Ingredients:

  • 2c – 245g flour
  • 1/3c – 100g sourdough starter
  • 1/4t salt
  • 3 eggs
  • 1/2c – 108g oil or butter
  • 1c – 200g sugar
  • 1/2t Baking Soda
  • 1c shredded carrots
  • 1/2c raisins

Cream Cheese Frosting Ingredients:

  • 1 block of cream cheese
  • 1 stick of butter
  • 1c powdered sugar

How to make Sourdough Carrot Cake Loaf

Add all the ingredients except the baking soda to a mixing bowl and mix until throughly incorporated.

Cover and ferment for 6-8 hours. Place the bowl in the fridge overnight to slow down the fermentation if you aren’t ready to bake it that evening.

The next morning, preheat the oven to 350. Line a loaf pan with wet parchment paper.

Add the baking soda to the batter and whisk it in until it’s incorporated.

Add the batter to the loaf pan and bake for 60 minutes or until a knife comes out clean.

Remove the loaf to a wire rack and cool completely.

While the loaf cools, mix the cream cheese frosting. Once the loaf has cooled, slather on the frosting and serve.

Save it for later…

Sourdough

Beating Winter Burnout: Gentle Productivity for Tired Moms

Mar 11, 2026 ·

Winter has a way of magnifying everything. The mess feels messier. The days feel longer. The laundry feels endless. For stay-at-home moms, especially, the darker months can quietly drain motivation and joy.

If you’ve found yourself feeling sluggish, behind, or simply uninspired in your homemaking, you are not failing. You are likely experiencing winter burnout. And the answer is not pushing harder. It’s embracing a gentler kind of productivity that works with the season instead of against it.

What Is Winter Burnout for Stay-at-Home Moms?

Winter burnout isn’t just physical exhaustion. It’s the emotional weight of repetition combined with shorter days, less sunshine, and fewer natural breaks in routine. When you’re home most of the day, cabin fever is real.

You may notice:

  • Low motivation to clean or cook
  • Irritability over small messes
  • Feeling behind even when you’re trying
  • Wanting to rest but never fully resting

Winter can expose unrealistic expectations we’ve quietly placed on ourselves. We expect summer energy in a January body. That mismatch creates frustration.

Why Productivity Feels Harder in the Winter

Our bodies naturally slow down in colder months. Historically, winter was a season of rest, mending, planning, and preserving. It was never meant to be high output.

But modern life doesn’t slow down. Social media doesn’t slow down. The to-do list certainly doesn’t slow down.

When you try to maintain peak performance in a low-energy season, burnout is almost guaranteed. Gentle productivity recognizes this reality and adapts accordingly.

What Is Gentle Productivity?

Gentle productivity is a homemaking approach that prioritizes consistency over intensity. It focuses on small daily wins instead of massive overhauls. It values peace over perfection.

Instead of asking, “How much can I accomplish today?” you begin asking, “What is the most important thing for today?”

This shift alone can lighten your mental load.

Step One: Choose Three Daily Priorities

During winter, reduce your expectations on purpose.

Each morning, identify three priorities:

  • One household task
  • One personal task
  • One relational task

For example:

  • Fold one load of laundry
  • Read for ten minutes
  • Play a board game with the kids

If you complete those three things, the day is a success. Anything extra is a bonus.

Step Two: Embrace Slower Rhythms

Winter is the perfect time to simplify your routines.

  • Rotate meals instead of trying new recipes every week.
  • Tidy in short bursts instead of deep cleaning the whole house.
  • Batch errands when possible to avoid constant outings in cold weather.

Create small anchors in your day like a cozy afternoon tea, quiet reading time, or lighting a candle during dinner prep. These rhythms give structure without pressure.

Step Three: Lower the Visual Noise

Clutter feels heavier in winter. With everyone indoors more often, mess accumulates quickly.

Instead of organizing everything, focus on visible surfaces. Clear the kitchen counters. Tidy the coffee table. Reset the entryway. When your eyes see calm, your mind often follows.

Step Four: Build Rest Into the Routine

Rest is not the reward for finishing everything. It is part of the plan.

Schedule quiet time after lunch. Go to bed earlier. Sit down with your coffee instead of drinking it while multitasking.

You are not lazy for needing rest. You are human.

Step Five: Reconnect With Your Purpose

Burnout often grows when homemaking feels invisible or monotonous.

Take a moment to remember why you chose this life. Your daily work creates stability, comfort, and security. Warm meals and clean clothes are not small things. They are quiet repeated acts of love.

Winter is a beautiful time to lean into that deeper meaning. Light a candle while you wash dishes. Play hymns or calming music during chores. Snuggle under those blankets when you can.

Let your home feel like a refuge from the cold world outside.

Final Thoughts on Beating Winter Burnout

Winter burnout does not mean you are failing as a homemaker. It means you are in a slower season.

Instead of fighting the season, adjust to it. Choose fewer priorities. Move more slowly. Rest intentionally. Celebrate small progress.

Gentle productivity allows you to care for your home without losing yourself in the process. And sometimes, that is the most productive choice of all.

Save it for later…

Homemaking, Homemaking Lifestyle

Homemaking is a Ministry: Finding Purpose in Daily Life

Mar 11, 2026 · Leave a Comment

For many stay-at-home moms, the daily tasks of homemaking—cooking, cleaning, laundry, and organizing—can sometimes feel repetitive or unnoticed. Yet, these routines hold immense value when approached with intentionality and love. Homemaking is more than chores; it is a meaningful ministry that nurtures your family and builds a foundation of faith in the home.

Recognizing homemaking as a ministry can transform your perspective. What may seem mundane becomes a sacred act of service when done as unto the Lord. Every effort in the home contributes to the spiritual, emotional, and physical well-being of your family and is a service done for the Lord.

Understanding this can help you approach each day with gratitude and diligence rather than fatigue. When you see your work as a ministry, it gives significance to tasks both big and small. This mindset changes the way you experience the rhythm of homemaking.

What It Means to View Homemaking as a Ministry

Viewing homemaking as a ministry means acknowledging that homemaking is a calling. Each meal prepared, each room cleaned, and each lesson taught carries lasting impact. They are opportunities that the Lord gives you to share his goodness, teach his kindness, and cultivate virtue. Your diligence creates a home life that is set apart noticeably from the world and reflects the light of the gospel.

Even simple tasks become acts of service when done with love and virtue. By offering your work as a means to worship the one who gave work, you honor God.

This perspective encourages you to find joy in the mundane everyday tasks because they are part of your calling. Daily routines are not repetitive burdens but opportunities to rise once again and praise his name.

Serving Your Family Through Love and Care

Homemaking as a ministry emphasizes service rather than obligation. Preparing meals, tidying spaces, and maintaining order are practical expressions of the love God has given you. These acts let you shower your family with the his bountiful goodness turning ordinary moments into extrordinary ones.

The way we interact with our loved ones is an opportunity to reflect how God interacts with us whether or not we deserve his patience or kindness. Its hard as moms to remember this in the moment, but our relationship with our children can impact how they view their Heavenly Father.

Even small gestures can share the love of God in ways that we cannot see. We may never know the full impact the little things we do have on all who enter under our roof. We may never see fully the blessing we are when we randomly smiled across the room on a hard day, repeated a task one more time with a gentle spirit, or went to extreme lengths to show our family love.

Cultivating Spiritual Growth in the Household

Your home provides a unique space for spiritual growth. Daily routines can be infused with prayer, Scripture reading, and intentional teaching moments. Singing, sharing things that over joyed us, or creating family traditions around Christian traditions shapes our children and their worldview.

By consistently infusing faith into the everyday, you lead your children towards Christ. Simple ways to do this even with small children are…

  • morning prayer time
  • teaching them prayers
  • letting them lead the prayer at meal time
  • playing the thankful game
  • praying with before bedtime
  • praying in disciplinary moments

Day after day, the repetition of words and acts revolving around Christ and his word shape those little hearts and minds towards something greater than a mere existence on this earth: for life eternal.

Finding Purpose in Ordinary Tasks

Sweeping floors, washing dishes, and folding laundry may seem mundane, but they carry significance when approached as service to Christ. Each task becomes a way to serve and honor God. By performing chores with gratitude and joy, you elevate the ordinary into acts of worship.

Routine tasks done with care and thoughtfulness leave lasting impressions. Children notice the love and attention given to the home, even if silently. Everyday work becomes a visible example of faithfulness and diligence, of Christ-like virtue.

Mindset matters more than efficiency. Viewing work as meaningful helps you embrace the rhythm of homemaking instead of feeling burdened by it. Ordinary tasks gain extraordinary value when performed with the purpose of serving Christ by serving your family.

Balancing Homemaking With Self-Care

Since homemaking is a ministry, ministering to yourself is essential. Rest, spiritual nourishment, and moments of quiet refresh your energy. This enables you to serve your family with joy and peace.

I have always liked how 1 Samuel 30:6 talks about David encouraging himself in the Lord. Isn’t that so applicable to homemakers?! How many times are we faced with a discouraging series of events or weighted down with the load of life or offended by the uncaring acts of others?

It it is necessary for us to learn how to bear up under the burdens and reflect Christ, to transcend how we truly feel, and serve our families freely once again.

Part of caring for ourselves is learning how to prevent burnout. Intentional breaks for prayer, reflection, or simple enjoyment sustain your well-being. Self-care equips you to approach homemaking with full cup from which others can draw from and be refreshed without leaving you empty.

We cannot care of others well if you do not first fill ourselves with what we want them to receive.

Encouragement for Homemakers

The impact of your work is often unseen, yet it is far-reaching. Values, habits, and love instilled in your home shape children’s character and faith. Your faithfulness creates a stable and nurturing environment that blesses the whole family.

Even small acts matter. Preparing meals, cleaning, and teaching lessons all contribute to a home filled with peace and purpose. Your ministry may be quiet, but its influence lasts beyond a lifetime.

Take heart in your calling. Every day presents opportunities to serve with intentionality and love. Your faithful care is a sacred contribution to your family and God’s greater plan.

Final Thoughts on Homemaking as a Ministry

When approached with purpose and virtue, homemaking becomes a ministry that shapes hearts, nurtures souls, and creates a refuge for your family. Ordinary routines become acts of love and devotion. Every task, no matter how small, carries eternal significance and transforms your home into a place of meaning and joy.

By embracing this mindset, homemaking becomes a source of fulfillment rather than fatigue. Daily efforts, performed with care and intention, reflect a greater purpose. Viewing homemaking as a ministry allows you to find joy, purpose, and lasting impact in the everyday rhythm of home life.

Save it for later…

Homemaking, Homemaking Lifestyle

Homemaking With Kids: Creating a Peaceful and Productive Home Together

Mar 11, 2026 · Leave a Comment

Homemaking with kids is a beautiful, messy, refining experience. The floors may never stay spotless for long, and the laundry somehow multiplies overnight, but the presence of children transforms ordinary routines into meaningful moments. Instead of viewing kids as interruptions to homemaking, you can begin to see them as active participants in building a warm and well-ordered home.

When you shift your mindset, everything changes. Homemaking is no longer something you try to squeeze in around your children; it becomes something you do alongside them. With intentional rhythms and realistic expectations, you can create a peaceful and productive home while raising capable, confident kids.

Adjusting Expectations in This Season

One of the biggest challenges of homemaking with kids is unrealistic expectations. Social media often highlights spotless homes without showing the toddlers scattering blocks moments later. In reality, a lived-in home with children will never look perfectly staged, and that is not a failure.

Lowering your standards does not mean embracing chaos. It means prioritizing what truly matters, such as clean kitchen counters, safe floors, and peaceful family rhythms. Focus on function over perfection, and remind yourself that training children is more important than impressing any guests you might have.

Creating Simple Daily Rhythms

Children thrive on predictability, and so do homes. Establishing a gentle daily rhythm helps both you and your kids know what to expect. Morning tidy-up times, afternoon quiet hours, and evening reset routines create structure without rigidity.

Start small by anchoring your day with just a few key habits. Make beds in the morning, run one load of laundry, and reset the kitchen after dinner. These simple touchpoints keep your home running smoothly even when the day feels full and it will compound over the years.

When children know that toys are picked up before lunch or that everyone helps with a five-minute tidy before bedtime, cooperation becomes more natural. Repetition builds habit, and habit builds peace.

Involving Kids in Household Tasks

Homemaking with kids becomes lighter when you involve them. Even toddlers can help put toys in bins, wipe low surfaces, or carry laundry to the basket. Older children can fold towels, unload the dishwasher, sweep floors, and assist with meal preparation.

Giving children real responsibility builds confidence and life skills. They begin to understand that the home belongs to everyone, not just mom. Work shared together strengthens family unity and teaches stewardship.

Expect it to take longer at first. Teaching a child to sweep properly will require patience, but the long-term benefits are worth the extra time. You are not just cleaning a floor; you are raising a capable adult.

Cleaning While You Live

One of the most effective strategies for homemaking with kids is learning to clean as you go. Wipe counters while lunch cooks, rinse dishes immediately after use, and sweep crumbs right after snack time. Small, consistent efforts prevent overwhelming messes later.

Keep basic cleaning supplies within reach in key areas of your home. A basket with a cloth and all-purpose spray can make quick touch-ups simple and efficient. These small resets throughout the day keep your home manageable without marathon cleaning sessions.

Accept that interruptions will happen. A spilled cup or a sudden sibling disagreement may delay your plans, but flexibility is part of successful homemaking with children. Pivot as needed, but keep going with your simple daily routine.

Cultivating a Peaceful Atmosphere

A peaceful home is not defined by silence but by tone. Soft music, consistent routines, and calm responses set the emotional temperature of your household. Children often mirror the atmosphere you create.

Speak gently, even when correcting. Pause before reacting to messes, remembering that accidents are part of childhood. Modeling patience teaches far more than perfectly folded laundry ever could.

Creating beauty in small ways also contributes to peace. Fresh flowers on the table, natural light through clean windows, or a cozy reading corner invite warmth into your home.

Teaching Responsibility Through Daily Life

Homemaking offers daily opportunities to teach responsibility. When children participate in chores, they learn discipline, teamwork, and gratitude. They begin to see that maintaining a home requires effort and care.

Instead of framing chores as punishment, present them as contributions and fun activities. Explain that everyone helps because everyone benefits from a clean and orderly home. This perspective builds ownership rather than resentment.

Celebrate progress rather than perfection. Praise effort when a child attempts to fold laundry or sweep the floor. Encouragement fosters growth and long-term cooperation.

Embracing the Beauty of This Season

Homemaking with kids is loud, unpredictable, but deeply meaningful. The fingerprints on the walls and the toys under the couch are evidence of life happening within your home. One day, the floors will stay clean longer than you expect, and you may even miss the chaos.

Choose to see this season as a gift rather than an obstacle. Your home is not meant to be a museum; it is meant to be a training ground for love, character, and faithfulness. Every meal served, every lesson taught, and every mess cleaned together builds something lasting.

Final Thoughts

Homemaking with kids requires flexibility, patience, and a willingness to let go of perfection. By adjusting expectations, establishing simple rhythms, involving children in daily tasks, and cultivating a peaceful atmosphere, you can create a home that is both productive and joyful.

Remember that your goal is not a flawless house but a flourishing family. When you invite your children into the work of the home, you are not only maintaining a space—you are shaping hearts and building memories that will last for years to come.

Save it for later…

Homemaking, Homemaking Lifestyle

15 Clever Spring Cleaning Hacks

Mar 11, 2026 · Leave a Comment

Spring is the perfect time to refresh your home after a long winter. But as a stay-at-home mom, the thought of scrubbing, decluttering, and organizing can feel overwhelming. That’s why smart spring cleaning hacks are a lifesaver.

These tips help you clean efficiently, save time, and make your home feel lighter and brighter without exhausting yourself. Whether you’re tackling the whole house or just one room, these hacks can simplify your routine and keep your home in order all season long.

Why Spring Cleaning Hacks Matter

Spring cleaning is more than just a chore—it’s an opportunity to reset your home and your mindset. Hacks and shortcuts help you…

  • save time and energy
  • reduce stress while cleaning
  • target problem areas efficiently
  • keep your home organized and functional better

By using clever strategies, you can accomplish more without feeling overwhelmed.

Hack 1: Declutter Before You Clean

Before you grab the mop or vacuum, it’s important to remove items that don’t belong. Donate or discard unused clothes, toys, and kitchen items, and use a laundry basket to quickly gather misplaced items. Focus on high-traffic areas first so you can see immediate progress. Decluttering before cleaning makes the process faster and prevents wasted effort on items that shouldn’t be in the space at all.

Hack 2: Use a Timer

Set a timer for fifteen to thirty minutes per task to create focused cleaning bursts. Short sprints prevent burnout, make it easier to maintain motivation, and allow you to see tangible progress. You can even involve your children in these timed cleaning challenges, which can turn chores into fun, manageable tasks.

Hack 3: Multi-Purpose Cleaners

Investing in a safe, multi-purpose cleaner can dramatically simplify your cleaning routine. One bottle can handle counters, tables, and cabinets, which reduces the number of products you need and saves both money and storage space. You can also use natural options such as vinegar, baking soda, or lemon, which are effective and kid-friendly.

Hack 4: Top-to-Bottom Cleaning

Always clean a room from top to bottom. Start by dusting ceiling fans and light fixtures, then wipe down walls and shelves, finishing with the floors. This prevents dust and dirt from falling onto freshly cleaned surfaces, ensuring your efforts aren’t wasted.

Hack 5: Keep Cleaning Tools Handy

Keep basic cleaning supplies accessible in each key area of your home. In the kitchen, have microfiber cloths, an all-purpose spray, and a scrub brush ready. In the bathroom, keep disinfectant, sponges, and a small brush for grout. For living areas, maintain a duster, vacuum attachments, and microfiber cloths. Having tools nearby saves time and encourages regular touch-ups.

Hack 6: Use Dryer Sheets to Dust Baseboards

A simple trick for quick dusting is to use a used dryer sheet on baseboards. Dryer sheets attract dust while leaving a subtle fresh scent. You can also use this method on window sills, shelves, and blinds for a fast, easy refresh.

Hack 7: Make Cleaning a Game for Kids

Cleaning doesn’t have to fall entirely on you. Turn chores into a game to involve your children. Set timer challenges like “Can you pick up all the toys before the timer dings?” or create sticker charts for completing tasks. Sorting games with clothes, books, or toys can make cleaning fun while teaching responsibility and teamwork.

Hack 8: Clean While You Cook

While you’re cooking, take advantage of pockets of downtime to tidy your kitchen and lighten the rest of your spring cleaning load. Wipe down the fronts of cabinets. Dust or quickly clean light fixtures and ceiling fans, and run a damp cloth along baseboards to catch crumbs and dust before they settle.

You are already in there making meal so why not take advantage of any down time you have in between steps.

Hack 9: Use Vinegar and Baking Soda for Tough Spots

For sinks, drains, and stubborn stains, sprinkle baking soda and spray with vinegar, then let it fizz before scrubbing. This non-toxic solution works on tubs, tiles, and even microwaves, making it a safe and effective alternative to harsh chemicals.

Hack 10: Group Similar Tasks

Batching similar tasks together can save significant time. Dust all surfaces in the house before vacuuming, wash all windows at once rather than room by room, and fold and put away laundry in one session instead of doing it piecemeal. Working in clusters increases efficiency and makes your cleaning feel less scattered.

Hack 11: Freshen Carpets Quickly

If deep steam cleaning isn’t an option, you can refresh carpets quickly by sprinkling baking soda over the surface and letting it sit for fifteen to thirty minutes before vacuuming. For an added touch, a few drops of essential oil can leave the carpet smelling fresh and clean.

Hack 12: Keep a Declutter Box

Place a declutter box in each room for items that don’t belong. At the end of the week, redistribute, donate, or discard items from the box. This habit prevents clutter from building up again and encourages intentional organization throughout your home.

Hack 13: Rotate Seasonal Items

Spring is a great time to rotate seasonal items. Store heavy coats and boots while bringing forward lighter linens and décor. You can also rotate toys and play items to keep things fresh for children, giving the home a sense of renewal and energy for the new season.

Hack 14: Use Lemon to Shine Fixtures

Lemon is a natural way to shine fixtures and appliances. Rubbing a lemon on faucets, knobs, and stainless steel appliances removes water spots and adds a subtle fresh scent. This simple hack works on sinks, shower heads, and cabinet handles, making your home sparkle naturally.

Hack 15: Schedule Quick Daily Touch-Ups

Instead of waiting for a full deep clean, spend ten to fifteen minutes each day tidying high-traffic areas. Wiping counters, sweeping kitchen floors, or fluffing pillows daily prevents mess from building up and makes weekly cleaning easier and less stressful.

Final Thoughts on Spring Cleaning Hacks

Spring cleaning doesn’t have to be a stressful marathon. With these fifteen hacks, you can maintain a cleaner, more organized home with less effort. The key is working smarter, not harder: declutter first, clean efficiently, and involve your family whenever possible.

I hope these 15 spring cleaning hacks motivate you to get to it and prepare your house for spring!

Save it for later…

Homemaking, Homemaking Lifestyle

Honey BBQ Chicken Rice

Mar 11, 2026 · Leave a Comment

Honey BBQ chicken rice is a simple and satisfying meal that comes together with just a few ingredients. Tender chicken is coated in a sweet and smoky honey barbecue sauce and served over warm rice for an easy dinner the whole family will enjoy. It’s the kind of comforting meal that works well for busy weeknights but is still flavorful enough to feel special.

This recipe is also very versatile and easy to customize. You can add roasted vegetables, corn, or a fresh salad on the side to round out the meal. Whether you are looking for a quick dinner idea or a simple meal prep option, honey BBQ chicken rice is a delicious and practical recipe to keep in your rotation.

Ingredients:

  • 1c rice
  • 3 Chicken thighs
  • 1/2 onion
  • 2 garlic cloves
  • 1c bbq sauce
  • 1/4c honey
  • 2T cocoa aminos

Equipment

  • Skillet
  • Spatula
  • 1c measuring cup
  • Instant pot
  • garlic press

How to make Honey BBQ Chicken Rice

Cook rice in the instant pot

Add 1c of rice to the instant pot and add 1:1 ratio of water to rice for white rice or 2:1 ratio of water to rice fro brown rice. Seal the instant pot and cook for 20 minutes. Let it release pressure naturally to finish cooking the rice.

Saute the onions

Add 1-2T of oil or butter to a skillet over medium heat. Slice 1/2 an onion and sauté it.

Brown the meat

While the onion sautés, chop 2-3 chicken thighs. Once the onions are mostly translucent, add the chicken. Peel and mince 2 cloves of garlic into the skillet. Season with 1/2t salt and 1/4t of ground pepper. Brown the meat, stirring occasionally.

Simmer the sauce

Once the meat is browned, add 1c of barbecue sauce, 1/4c honey, 2T soy sauce or cocoa aminos. Stir and cook for 3-5 minutes until it starts to thicken.

Serve

Serve over rice with a side of veggies.

Recipes

Spring Homemaking with Kids: Simple Ways to Include Your Children

Mar 10, 2026 · Leave a Comment

Spring is a wonderful time to refresh your home, reset routines, and spend more time working alongside your children. The longer days and warmer weather naturally invite everyone to be more active, making it the perfect season to involve kids in homemaking tasks. Instead of trying to complete everything while children play elsewhere, spring homemaking can become a time of teaching, connection, and shared responsibility.

Including your children in homemaking helps them learn valuable life skills while also building a sense of pride in caring for their home. Simple tasks like baking together, planting a garden, or tidying a room can become meaningful moments that shape their understanding of work, family, and stewardship.

Here are simple ways to include your children in spring homemaking while teaching them practical skills they can carry with them for life.

Why Spring Is the Perfect Time to Teach Homemaking Skills

Spring brings a natural rhythm of renewal. Windows open, gardens begin to grow, and many families feel inspired to clean and organize their homes. This season provides countless opportunities for children to participate in meaningful work.

Children often enjoy helping when tasks feel hands-on and purposeful. Working together outside, preparing fresh foods, or refreshing living spaces allows kids to see immediate results from their efforts. When children participate regularly, homemaking becomes a normal and valued part of family life.

Teaching these skills early helps children grow into capable and confident adults who understand how to care for a home and contribute to a household.

Teaching Kids Simple Spring Chores

Chores are one of the easiest ways to involve children in homemaking. Even very young children can help with small responsibilities that support the family.

Start by choosing simple tasks that match your child’s age and ability. Young children might help wipe tables, sort laundry, or pick up toys. Older children can sweep floors, vacuum, fold laundry, or help organize closets during spring cleaning.

Related Post: Spring Cleaning with Kids

The goal is not perfection but participation. Work alongside your children whenever possible so they can observe how tasks are done. Over time they will develop confidence and independence in their responsibilities.

Creating a simple daily chore routine can help children understand that caring for the home is part of everyday life.

Gardening Together as a Family

Spring gardening is one of the most enjoyable ways to include children in homemaking. Digging in the soil, planting seeds, and watching plants grow gives children a hands-on lesson in patience and stewardship.

Children can help prepare garden beds, plant seeds, water plants, and harvest vegetables. Even a small container garden on a porch or windowsill can provide opportunities for kids to participate.

Gardening also teaches children where food comes from and encourages them to appreciate fresh ingredients. Many children feel proud to eat vegetables they helped grow themselves.

Making gardening a regular family activity throughout the spring can create lasting memories and a deeper appreciation for nature.

Baking and Cooking with Kids

The kitchen is another wonderful classroom for teaching homemaking skills. Spring is a great time to introduce children to simple baking and cooking tasks.

Younger children can help stir ingredients, measure flour, wash fruits and vegetables, or shape dough. Older children can begin learning basic recipes, crack eggs, and help prepare simple meals.

Baking together also naturally introduces math skills, patience, and following instructions. More importantly, it teaches children that food preparation is a valuable and meaningful part of caring for a family.

Simple recipes like muffins, bread, or cookies or whatever you are making for dinner are great starting points for building confidence in the kitchen.

Teaching Organization and Cleaning Skills

Spring cleaning provides many opportunities for children to learn how to care for their belongings and keep spaces tidy. Instead of tackling all the work yourself, invite your children to participate.

Children can help sort toys, organize bookshelves, wipe baseboards, and declutter clothing that no longer fits. Working together allows you to demonstrate how to care for the home while helping children learn responsibility.

This is also a great time to teach children simple systems for keeping their spaces organized. Showing them where items belong and how to put things away makes daily cleaning much easier.

These small lessons help children develop habits that will benefit them for years to come.

Making Homemaking a Family Culture

Including children in homemaking is not just about completing chores. It is about building a family culture where everyone contributes and works together.

When children feel included in meaningful work, they often develop a greater sense of belonging within the home. They learn that their efforts matter and that maintaining a home is a shared responsibility.

Simple routines like cleaning together for a few minutes each morning, gardening on weekends, or baking together once a week can create rhythms that children look forward to.

Over time these shared activities become traditions that strengthen family bonds.

Encouraging a Joyful Attitude Toward Work

Children learn a great deal from observing their parents’ attitudes toward homemaking. When work is approached with patience and gratitude, children often adopt the same perspective.

Instead of presenting chores as burdens, try framing them as joyful activities and ways to care for the home and the people who live there. Playing music, chatting while working, or celebrating completed tasks can make homemaking feel lighter and more enjoyable.

Spring is a beautiful reminder that caring for a home is part of creating a peaceful and welcoming environment for the whole family.

Final Thoughts

Spring homemaking with kids does not have to be complicated. Simple daily tasks like baking, gardening, cleaning, and organizing can become valuable opportunities to teach life skills.

By inviting your children into the work of the home, you are helping them grow in responsibility, confidence, and appreciation for family life. These small moments spent working side by side often become some of the most meaningful memories of childhood.

Homemaking is not just about maintaining a house. It is about nurturing a home, and including your children in that work is one of the most meaningful ways to do it.

Save it for later…

Homemaking, Homemaking Lifestyle

How to Meal Plan: A Simple Guide to Stress-Free Family Meals

Mar 10, 2026 · Leave a Comment

Meal planning is one of the most powerful tools a homemaker can use to simplify life at home. Instead of scrambling to figure out dinner every evening, a meal plan gives you clarity, saves time, reduces grocery costs, and makes feeding your family far less stressful.

If you’ve ever stood in front of the fridge at 5 p.m. wondering what to cook, learning how to meal plan can completely change your routine. With a simple system, you can plan meals that fit your family, your schedule, and your budget.

Why Meal Planning Matters

Meal planning is not about perfection. It’s about removing daily decision fatigue and giving your week a little structure.

When you plan meals ahead of time, you can:

  • Save money on groceries
  • Reduce food waste
  • Avoid last-minute takeout
  • Make healthier meals for your family
  • Spend less time thinking about dinner

Instead of making the same decision every day, you make it once at the beginning of the week.

Step 1: Choose a Meal Planning Day

The first step to successful meal planning is setting aside time each week to do it. Many homemakers choose Saturday or Sunday so they can grocery shop before the new week begins.

During this time you will:

  • Plan meals
  • Check your pantry and fridge
  • Write your grocery list

This process usually takes about 15–20 minutes once you get used to it.

Step 2: Check What You Already Have

Before planning new meals, look through your refrigerator, freezer, and pantry.

Ask yourself:

  • What meat do I already have?
  • What vegetables need to be used soon?
  • Are there leftovers that can become another meal?

Planning meals around food you already have saves money and reduces waste.

Step 3: Choose Simple Family Meals

Meal planning works best when you keep meals simple. Choose recipes your family already enjoys and rotate them throughout the month.

A balanced meal plan might include:

  • Chicken dinners
  • Pasta dishes
  • Soup or slow cooker meals
  • Simple casseroles
  • Leftover nights

You do not need a brand-new recipe every night. Repeating meals actually makes planning easier.

Example weekly meal plan:

Monday: Chicken stir fry with rice
Tuesday: Tacos
Wednesday: Pasta with garlic olive oil sauce
Thursday: Baked salmon and vegetables
Friday: Homemade pizza
Saturday: Soup and bread
Sunday: Leftovers or simple sandwiches

Simple meals are easier to cook and easier to shop for.

Step 4: Write a Grocery List

Once your meals are planned, write your grocery list based on the ingredients you need.

Organize your list by category to make shopping faster:

  • Produce
  • Meat
  • Dairy
  • Pantry items
  • Frozen foods

A clear list helps you avoid impulse purchases and stay within your grocery budget.

Step 5: Prep What You Can Ahead of Time

Meal planning becomes even easier when you prep a few ingredients after grocery shopping.

You might:

  • Wash and chop vegetables
  • Marinate meat
  • Cook a batch of rice or grains
  • Prepare sauces or dressings

Even small preparation steps can make cooking during the week much faster.

Step 6: Stay Flexible

Life with a family is rarely predictable. Some days you may not feel like cooking what you planned, and that is okay.

Meal plans should be flexible.

You can swap meals around based on your energy level, schedule, or leftover ingredients. The goal is not to follow the plan perfectly but to give yourself a helpful guide.

Step 7: Build a List of Go-To Meals

Over time, keep a list of meals your family enjoys. This makes future meal planning even easier.

Your list might include:

  • Chicken and rice bowls
  • Sourdough pizza night
  • Pasta with garlic olive oil sauce
  • Slow cooker chili
  • Breakfast for dinner

Having 15–20 reliable meals makes planning almost automatic.

Tips for Making Meal Planning Easier

Start Small
If planning a full week of meals feels overwhelming, start with just three or four dinners. This small step still reduces stress while helping you build the habit of planning ahead. As meal planning becomes more comfortable, you can gradually expand your plan to include the whole week.

Repeat Favorite Meals
You don’t need new recipes every week. In fact, repeating meals your family already enjoys makes meal planning much easier. Rotating familiar dinners saves time, simplifies grocery shopping, and ensures that everyone looks forward to the meals you prepare.

Keep a Running Grocery List
Instead of trying to remember everything you need when it’s time to shop, keep a grocery list going throughout the week. Whenever you run out of an item or notice something getting low, add it to the list right away. This habit makes grocery shopping faster and prevents forgotten ingredients.

Plan an Easy Meal Night
Choose one night each week for a very simple meal. This might be leftovers, sandwiches, breakfast for dinner, or a quick soup. Having an easy meal night gives you breathing room during busy weeks and keeps your routine flexible.

Match Meals to Your Schedule
Some days are busier than others, so plan meals accordingly. Save quick or slow cooker meals for busy evenings, and choose slightly more involved recipes for days when you have more time at home.

Something that really helps me is having set meals for Sundays. Sundays are super busy so I rely heavily on the repetition and familiarity of the same meals. This helps the day go smoother because the family also knows what we are having and they are usually pretty excited about it.

Matching your meals to your schedule helps prevent stress and last-minute changes.

Final Thoughts!

Learning how to meal plan is one of the simplest ways to reduce stress in your home. With a little preparation each week, you can spend less time worrying about dinner and more time enjoying meals with your family.

A simple plan brings structure to your kitchen and peace to your evenings.

If you want help organizing your routines, planning meals, and managing your home more smoothly, the Homemaking Planner Bundle includes two helpful ebooks plus printable planners designed to make homemaking simpler and more organized.

Download Meal Plan Printable

Save it for later…

Homemaking, Homemaking Lifestyle

The Ultimate Whole House Spring Cleaning Checklist

Mar 10, 2026 · Leave a Comment

Spring has a way of making you notice everything. The smudges on the baseboards. The dust on the ceiling fan. The drawer that won’t quite close anymore. After a long winter indoors, it’s natural to crave a fresh start.

But if you’re a stay-at-home mom, the idea of “spring cleaning” can feel overwhelming. You’re already managing meals, laundry, children, and the daily rhythm of your home. The last thing you need is a 47-page cleaning plan that leaves you exhausted.

This spring cleaning checklist is designed to help you be thorough but realistic. You can move through it slowly over several weeks or tackle one room at a time. The goal isn’t perfection. It’s a lighter, fresher home that supports your family well.

Why a Spring Cleaning Checklist Matters

A checklist removes decision fatigue. Instead of walking from room to room wondering what to do next, you simply follow the plan. It helps you:

  • Avoid missing important tasks
  • Work efficiently
  • Break big jobs into manageable pieces
  • Feel a sense of progress

Spring cleaning isn’t about scrubbing every inch of your house in one weekend. It’s about resetting your home after winter and preparing for a new season of life.

How to Use This Spring Cleaning Checklist

Before you begin, keep these tips in mind:

  • Start small. Choose one room or category at a time.
  • Work in 30–60 minute blocks. Set a timer and stop when it goes off.
  • Declutter as you clean. It makes deep cleaning easier and faster.
  • Involve your children where possible. Even young kids can wipe baseboards or sort toys.

Now let’s walk through the checklist.

Whole House Spring Cleaning Checklist

These tasks apply throughout your home.

  • Dust ceiling fans and light fixtures
  • Wash windows inside and out
  • Wipe down baseboards and door frames
  • Clean air vents and replace HVAC filters
  • Vacuum and rotate mattresses
  • Wash curtains and wipe down blinds
  • Dust walls and corners for cobwebs
  • Wipe down doors and light switches
  • Clean and sanitize trash cans
  • Deep clean floors including edges and corners

Kitchen Spring Cleaning Checklist

The kitchen works hard all winter long. Spring is the perfect time to give it extra attention.

  • Empty and wipe down all cabinets and drawers
  • Declutter mismatched containers and unused gadgets
  • Deep clean the refrigerator and freezer
  • Pull out and clean behind the stove and fridge
  • Clean inside the oven
  • Wipe down backsplash and walls
  • Sanitize countertops and cutting boards
  • Clean small appliances inside and out
  • Organize the pantry and discard expired food
  • Wash reusable grocery bags

Bathroom Spring Cleaning Checklist

Bathrooms need more than a quick weekly wipe down.

  • Scrub grout and tile
  • Wash shower curtains and liners
  • Clean behind and around the toilet
  • Empty and wipe out drawers and cabinets
  • Discard expired medications and toiletries
  • Wash bath mats
  • Clean mirrors thoroughly
  • Descale faucets and shower heads
  • Sanitize trash cans

Bedroom Spring Cleaning Checklist

A clean bedroom creates a restful space.

  • Wash all bedding including pillows and mattress covers
  • Flip or rotate mattresses
  • Declutter closets and donate unused clothing
  • Store winter clothes and boots
  • Dust nightstands and lamps
  • Clean under the bed
  • Wipe down dressers inside and out
  • Vacuum or mop floors thoroughly

Living Room Spring Cleaning Checklist

This is often the most used room in the house.

  • Vacuum upholstered furniture and under cushions
  • Wash throw blankets and pillow covers
  • Dust shelves, books, and décor
  • Clean electronics and remote controls
  • Wipe down coffee tables and side tables
  • Organize toys, games, or magazines
  • Clean windows and window sills
  • Freshen rugs or schedule professional cleaning if needed

Entryway and Mudroom Checklist

Spring means more outdoor activity and muddy shoes.

  • Declutter coats and donate unused items
  • Store heavy winter gear
  • Wipe down walls and doors
  • Clean shoe racks and baskets
  • Wash doormats
  • Organize backpacks and seasonal items

Garage and Outdoor Spaces

As the weather warms up, you’ll likely spend more time outside.

  • Sweep and declutter the garage
  • Sort and organize tools
  • Check and clean outdoor furniture
  • Wash patio cushions
  • Clean out garden beds
  • Wash exterior windows
  • Wipe down front door and porch décor

A Gentle Reminder About Overwhelm

If you read this list and immediately feel tired, pause. You do not have to do all of this at once. Spring cleaning can stretch over an entire season.

Choose one space. Finish it. Celebrate that progress.

Sometimes the most powerful reset isn’t scrubbing every surface. It’s clearing one drawer that has bothered you for months.

Final Thoughts on Spring Cleaning as a Homemaker

Spring cleaning is less about shining floors and more about renewing your home. It’s about creating a space that feels lighter, calmer, and ready for the months ahead.

As a stay-at-home mom, your work is constant and often unseen. Let this checklist serve you, not burden you. Work steadily. Rest when you need to. Invite your children into the process.

A fresh home doesn’t happen in one day. It happens in faithful, ordinary moments — one small task at a time.

Download Checklist Here!

Save it for later…

Homemaking, Homemaking Lifestyle

How to Spring Clean with Kids

Mar 10, 2026 · Leave a Comment

Spring is the perfect time to refresh your home and get organized, but tackling a deep clean can feel overwhelming—especially if you have children. The good news is that involving your kids in spring cleaning not only lightens your workload, it also teaches them responsibility, teamwork, and practical homemaking skills. With the right approach, spring cleaning with kids can be a fun and rewarding family activity.

Why Include Kids in Spring Cleaning

Including children in household chores has multiple benefits. It helps them develop a sense of responsibility, encourages independence, and teaches valuable life skills that they can carry into adulthood. Additionally, working together as a family strengthens bonds and creates a sense of accomplishment when everyone contributes.

Spring cleaning is also a perfect time to set routines and show children how to break down big tasks into manageable steps. By demonstrating how to clean efficiently and systematically, kids learn that maintaining a tidy home is achievable and even enjoyable.

Preparing for Spring Cleaning with Kids

Preparation is key to a successful spring cleaning session with children. Start by creating a plan that outlines which areas of the home need attention. Assign age-appropriate tasks so that children feel confident and capable.

Gather cleaning supplies ahead of time. Use kid-friendly options when possible, such as non-toxic sprays and gentle cloths, to ensure safety. Consider having gloves, aprons, and small caddies for each child so they feel equipped and ready to work.

Finally, set expectations. Explain what tasks need to be completed and how long the session will last. Keeping sessions short and structured helps maintain focus and prevents frustration.

Kid-Friendly Spring Cleaning Tasks

There are plenty of ways to involve children in spring cleaning without overwhelming them. Some tasks can be simple and even fun:

  • Dusting lower shelves and furniture
  • Wiping down tables and counters
  • Organizing toys, books, and closets
  • Sweeping floors or using a small handheld vacuum
  • Folding and sorting laundry
  • Helping wash windows or mirrors with a wet rag

For younger children, turning chores into games can make the process exciting. Use timers, play upbeat music, or create a points system to reward effort. Older children can tackle more complex tasks like vacuuming, organizing pantry items, or assisting with deeper cleaning projects.

Making Spring Cleaning Enjoyable

To keep kids engaged, focus on making cleaning interactive and rewarding. Encourage teamwork and celebrate accomplishments. Praise their effort rather than perfection to build confidence and motivation.

Consider incorporating small breaks with snacks or outdoor play to make the session feel balanced. You can also challenge kids to “beat the clock” for certain tasks, turning cleaning into a fun competition.

Teaching Homemaking Skills Through Cleaning

Spring cleaning offers a unique opportunity to teach children essential homemaking skills. Show them how to properly use cleaning supplies, organize belongings, and maintain routines. Explain the reasoning behind each task, such as why wiping counters prevents germs or how decluttering makes a home feel calm and welcoming.

By consistently involving children in household chores, you set the foundation for lifelong skills like time management, organization, and responsibility.

Creating a Spring Cleaning Routine

Incorporate spring cleaning into a larger seasonal homemaking routine. Break down tasks by room or area, and create a checklist that children can follow. This provides structure and helps kids visualize progress as they complete each task.

Pair spring cleaning with other seasonal homemaking activities, such as decluttering closets, washing linens, or planning seasonal meals. This teaches children that cleaning is just one part of maintaining a home, making it feel purposeful rather than a chore.

Final Thoughts

Spring cleaning with kids doesn’t have to be stressful or overwhelming. By preparing ahead, assigning age-appropriate tasks, and making the process fun, you can transform cleaning into a family activity that teaches responsibility and homemaking skills.

When children are involved, spring cleaning becomes more than just tidying up—it becomes a way to instill habits, teamwork, and pride in maintaining a clean and welcoming home. Start small, stay positive, and enjoy the satisfaction of a refreshed home and children who are proud to contribute.

Related Post: Whole House Spring Cleaning Checklist

Save it for later…

Homemaking, Homemaking Lifestyle

9 Practical Spring Cleaning Ideas

Mar 10, 2026 · Leave a Comment

Spring has a way of shining a spotlight on everything. The fingerprints on the walls, the dust on the ceiling fan, the clutter that quietly multiplied over winter. After months of being indoors, most homemakers feel that pull toward a fresh start.

But spring cleaning doesn’t have to mean exhausting yourself with an unrealistic deep-clean marathon. The goal isn’t perfection. It’s creating a lighter, calmer home that supports your family well.

If you’re ready to refresh your space without burnout, these spring cleaning ideas will help you reset your home in simple, manageable ways.

Why Spring Is the Perfect Time to Reset Your Home

Winter routines tend to be heavier. More time indoors means more mess, more cooking, more laundry, and more clutter buildup. Spring offers:

  • Longer daylight hours
  • Warmer weather for open windows
  • A natural shift in energy
  • Motivation to prepare for summer activities

Instead of thinking of spring cleaning as one overwhelming project, think of it as a seasonal reset. A fresh rhythm for your home.

Start With a Decluttering Sweep

Before deep cleaning, remove what doesn’t belong.

Walk through your home with a laundry basket and collect:

  • Outgrown children’s clothing
  • Broken toys
  • Expired pantry items
  • Unused kitchen gadgets
  • Papers that need filing or tossing

Decluttering first makes cleaning faster and more effective. It’s hard to wipe down shelves that are packed full.

Focus on High-Impact Areas First

If time is limited, focus on the areas that will make the biggest difference visually and functionally.

  • Clean windows inside and out to let in more natural light.
  • Dust ceiling fans and light fixtures.
  • Wipe down baseboards in main living areas.
  • Clean entryways and front doors.

These simple tasks can make your entire home feel brighter.

Refresh Your Kitchen for the New Season

The kitchen works hard all winter. Give it extra attention.

  • Empty and wipe down all cabinets and drawers.
  • Deep clean the refrigerator and freezer.
  • Organize the pantry and discard expired items.
  • Clean behind and under large appliances.
  • Wash trash cans

Consider switching out heavy winter meal plans for lighter, fresh spring recipes. A clean kitchen pairs beautifully with a seasonal menu shift.

Deep Clean Soft Surfaces

Soft surfaces collect dust and odors over time.

  • Wash curtains and wipe down blinds.
  • Vacuum upholstered furniture thoroughly.
  • Wash throw pillow covers and blankets.
  • Air mattresses.
  • Clean or air out rugs.

These small efforts improve air quality and make your home feel refreshed.

Tackle Forgotten Spaces

Spring cleaning is the perfect time to address overlooked areas.

  • Clean air vents and replace HVAC filters.
  • Wipe down walls and remove scuff marks.
  • Clean light switches and door handles.
  • Dust the tops of cabinets and door frames.
  • Organize junk drawers.

These details may not be obvious at first glance, but they make a noticeable difference.

Organize for Warmer Weather

As seasons change, so do your family’s needs.

  • Store winter coats and boots.
  • Rotate seasonal clothing.
  • Prepare outdoor play bins for easy access.
  • Organize gardening tools.
  • Create a designated space for sunscreen, hats, and outdoor essentials.

Planning ahead now will make busy summer days smoother.

Create a Simple Cleaning Schedule

Instead of trying to do everything at once, spread tasks over several weeks.

  • Week 1 focus on bedrooms.
  • Week 2 focus on kitchen and pantry.
  • Week 3 focus on living areas.
  • Week 4 focus on outdoor spaces and garage.

Working in small blocks of time keeps you from burning out. Even 30 minutes a day adds up quickly.

Related Post: Spring Cleaning Checklist

Involve Your Children

Spring cleaning doesn’t have to fall entirely on you.

  • Young children can sort toys or wipe baseboards.
  • Older kids can vacuum, dust, or help organize closets.
  • Teens can handle garage or outdoor projects.

Teaching responsibility while working together builds teamwork and lightens your load.

Related Post: Spring Cleaning with Kids

Add Beauty as You Clean

Spring cleaning isn’t only about removing dirt. It’s about creating a space that feels joyful.

  • Open windows whenever possible.
  • Add fresh flowers to the table.
  • Rearrange furniture for a lighter feel.
  • Switch to lighter blankets and linens.
  • Diffuse fresh, citrus-based scents.

Small touches of beauty make the effort worthwhile.

Keep Expectations Realistic

If reading a long list makes you feel tired, take a breath. You do not need a magazine-perfect home.

Spring cleaning is a process, not a race. Focus on progress, not perfection. One cleaned drawer, one organized shelf, one freshened room at a time.

Your home serves real people. That means it will never stay spotless for long. But it can feel lighter, calmer, and more prepared for the new season.

Final Thoughts on Spring Cleaning Ideas

Spring cleaning is less about scrubbing every inch of your home and more about renewing your space. It’s an opportunity to release what no longer serves your family and prepare for the months ahead.

As a stay-at-home mom, your work matters. A freshened home can support your routines, encourage peace, and make everyday life feel more manageable.

Start small. Stay steady. Let this season be about creating a home that feels ready for new life, new rhythms, and new joy.

Save it for later…

Homemaking, Homemaking Lifestyle

DIY Easter Crafts for a Beautiful and Meaningful Spring at Home

Mar 10, 2026 · Leave a Comment

Easter is one of the sweetest times of the year to slow down and create something beautiful with your hands. As the days grow brighter and your home fills with fresh air and open windows, simple DIY Easter crafts can add warmth, meaning, and charm to your space.

Whether you are crafting with little ones at the kitchen table or enjoying a quiet evening project after bedtime, handmade decorations bring heart into your home in a way store-bought items simply cannot.

In this post, you will find inspiring DIY Easter craft ideas that are simple, budget-friendly, and perfect for old-fashioned homemakers who love adding thoughtful seasonal touches.

Why DIY Easter Crafts Matter

Crafting for Easter is about more than decorations. It is about cultivating a peaceful home, creating memories with your children, and marking the rhythm of the season with intention. Handmade pieces often become keepsakes. A painted wooden cross, a child’s first decorated egg, or a carefully arranged wreath can become part of your family’s traditions year after year.

DIY projects also fit beautifully into a one-income home. With a little creativity and a few basic supplies, you can transform what you already have into something fresh and festive.

DIY Easter Wreath Ideas

A handmade wreath is one of the easiest ways to welcome spring into your home.

Grapevine Spring Wreath

Start with a simple grapevine base. Add faux greenery, soft pastel florals, and a burlap or linen bow. Tuck in speckled eggs or a small wooden cross for a subtle nod to the meaning of Easter. This style works beautifully for a front door or above a mantel.

Minimalist Greenery Wreath

If you prefer a simpler look, wrap a thin metal hoop with eucalyptus stems and secure with floral wire. Add a soft ribbon for hanging. This understated design feels fresh, clean, and timeless.

Children’s Handprint Wreath

Cut handprints from pastel cardstock and glue them in a circle on a cardboard base. Add “He Is Risen” or “Happy Easter” in the center. This is a sweet keepsake craft for young children.

Painted Easter Egg Crafts

Decorating eggs is a classic tradition, but you can elevate it with a few creative twists.

Naturally Dyed Eggs

Use ingredients like onion skins, turmeric, blueberries, or red cabbage to create soft, earthy tones. These natural dyes produce beautiful, muted colors that feel old-fashioned and charming.

Pressed Flower Eggs

After dyeing eggs in light shades, gently press small dried flowers onto the shells using a thin layer of glue. The result is delicate and perfect for displaying in a wooden bowl.

Scripture or Quote Eggs

Use a fine-tip marker to write short Bible verses or meaningful phrases on dyed eggs. Display them in a basket lined with linen for a thoughtful centerpiece.

Simple Easter Crafts for Toddlers

If you have little ones underfoot, keep projects simple and low-prep.

Paper Plate Lambs

Cut cotton balls in half and glue them onto a paper plate. Add construction paper ears and draw a sweet face in the center. It is simple, inexpensive, and always adorable.

Sticker Cross Art

Draw a simple cross outline on cardstock. Let toddlers fill the shape with colorful stickers. This keeps tiny hands busy while reinforcing the meaning of the season.

Finger-Painted Resurrection Scene

Use brown and blue paint to create a simple hill and sky. Add a paper cutout of an empty tomb. Even abstract toddler art can become meaningful when you talk through the story together.

DIY Easter Table Decor

Your Easter table is a beautiful place to add handmade touches.

Cloth Napkin Rings

Cut strips of burlap or linen and tie them around cloth napkins. Tuck in a small sprig of rosemary or lavender for a natural detail.

Handwritten Place Cards

Use kraft cardstock and write each family member’s name in simple script. Add a small twine bow or mini flower to each card.

Mason Jar Centerpieces

Fill mason jars with fresh tulips or daffodils. Wrap twine around the rim for a rustic touch. Group three jars together for an easy but charming centerpiece.

Faith-Based Easter Crafts

If your home centers around the deeper meaning of Easter, consider crafts that reflect that focus.

Wooden Cross Wall Art

Use reclaimed wood or inexpensive craft boards to assemble a simple cross. Sand lightly and stain for a rustic look. Hang it in your entryway or living room during the Easter season.

Resurrection Garden

Fill a shallow dish with soil. Add small stones to create a tomb, moss for greenery, and a small cross made from twigs. This is a beautiful visual reminder for children and adults alike.

Scripture Banner

Cut small triangle flags from fabric or cardstock and write one word from a favorite verse on each piece. String them together with twine and hang across a window or mantel.

How to Make Time for Seasonal Crafting

If your days already feel full, try adding DIY Easter crafts into your weekly rhythm instead of treating them as extra tasks. You might set aside one afternoon a week during the month leading up to Easter. Light a candle, put on soft music, and let crafting become part of your homemaking routine rather than another obligation.

You do not need elaborate supplies or hours of uninterrupted time. A single simple project completed slowly and joyfully can bring more beauty into your home than an entire afternoon of rushed perfection.

As an Amazon Associate, I earn from qualifying purchases. This means if you click on one of my affiliate links and make a purchase, I may receive a small commission at no additional cost to you. I only recommend products that I personally use, love, or believe will be helpful to my readers.

Final Thoughts on DIY Easter Crafts

DIY Easter crafts are a lovely way to celebrate spring, create family traditions, and add intentional beauty to your home. Whether you choose a simple wreath, naturally dyed eggs, or a meaningful resurrection garden, the goal is not perfection. It is presence.

Start with one small project this week. Gather your supplies, clear the table, and invite your children to join you. The memories you create will last far longer than the decorations themselves.

Save it for later…

Homemaking, Homemaking Lifestyle

Easter Wreath Ideas: Beautiful and Simple Ways to Decorate Your Door for Spring

Mar 10, 2026 · Leave a Comment

An Easter wreath is one of the simplest ways to welcome spring into your home. Before guests even step inside, a wreath on the front door quietly sets the tone for the season — fresh, hopeful, and full of life.

Whether your style leans traditional, rustic, farmhouse, or minimal, there are Easter wreath ideas that can reflect both the beauty of spring and the deeper meaning of the holiday. The best part is that many of these ideas are simple enough to make yourself.

Here are inspiring Easter wreath ideas to help you decorate your home with intention this season.

Classic Floral Easter Wreath Ideas

Nothing says spring quite like fresh florals. A floral Easter wreath brings softness and color to your entryway.

Tulip Wreath
Soft pink, white, or yellow tulips arranged around a grapevine base create a timeless look. Faux tulips work beautifully and can be reused each year.

Wildflower Wreath
A mix of small blossoms and greenery creates a meadow-inspired wreath that feels natural and relaxed.

Hydrangea Wreath
Large hydrangea blooms in pale blue, blush, or cream offer a fuller, more dramatic look while still feeling fresh and seasonal.

Floral wreaths transition easily from Easter into the rest of spring, making them a practical decorating choice.

Rustic Easter Wreath Ideas

If you love a cozy farmhouse aesthetic, rustic Easter wreaths add charm without feeling overly decorative.

Grapevine Wreath with Greenery
Keep it simple with eucalyptus, lamb’s ear, or olive branches tucked into a grapevine wreath.

Burlap Bow Accent
Add a soft burlap or linen bow for texture and warmth.

Moss and Twig Wreath
Use moss, twigs, and subtle white flowers for an organic, woodland feel.

Rustic wreaths feel understated and timeless, perfect for those who prefer natural materials.

Faith-Inspired Easter Wreath Ideas

For families who want their Easter decor to reflect the spiritual meaning of the holiday, a faith-centered wreath is a beautiful option.

Cross Wreath
Attach a small wooden cross to a base of greenery and white flowers for a simple yet meaningful design.

Crown of Thorns Inspired Wreath
A minimal wreath of twisted grapevine can subtly represent the crown of thorns while maintaining elegance.

White Lily Wreath
Lilies are often associated with Easter and symbolize purity and resurrection. Incorporating white lilies creates a strong visual connection to the season.

These wreaths gently communicate the heart of Easter in a way that is beautiful and reverent.

Easter Wreath Ideas with Pastel Touches

If you enjoy a softer, more playful look, pastel accents can add cheer without overwhelming your decor.

Ribbon in Soft Spring Colors
Blush, sage, pale blue, and soft yellow ribbons can be tied into a bow and added to a simple greenery wreath.

Speckled Egg Accents
Small faux eggs tucked into the wreath bring a classic Easter touch.

Mini Bunny Detail
A subtle wooden bunny or silhouette can add whimsy while keeping the design tasteful.

The key is balance. A few carefully chosen pastel details feel festive without looking cluttered.

Minimalist Easter Wreath Ideas

If you prefer a clean and simple look, minimal wreaths are both elegant and easy to create.

Single Greenery Ring
A metal hoop or grapevine wreath with asymmetrical greenery on one side creates a modern, airy design.

All-White Wreath
White flowers with soft greenery feel peaceful and refined.

Monogram Accent
Add a wooden or metal initial to personalize your wreath while keeping the design simple.

Minimal wreaths pair beautifully with neutral home exteriors and understated decor styles.

How to Make Your Own Easter Wreath

Creating a DIY Easter wreath can be both affordable and enjoyable. All you need is a hot glue gun and a few items.

  • Start with a base such as grapevine, metal hoop, or foam ring.
  • Choose one main element, like greenery or florals.
  • Add one accent, such as ribbon, eggs, or a wooden detail.
  • Secure everything with floral wire or hot glue.

Keeping your design simple often results in the most elegant look.

Decorating Beyond the Front Door

Easter wreaths are not limited to your front door.

  • Hang one above a fireplace mantel.
  • Use a smaller version on kitchen cabinets.
  • Place one on an interior door for a soft seasonal touch.

Repeating small seasonal details throughout your home creates cohesion and warmth.

As an Amazon Associate, I earn from qualifying purchases. This means if you click on one of my affiliate links and make a purchase, I may receive a small commission at no additional cost to you. I only recommend products that I personally use, love, or believe will be helpful to my readers.

Final Thoughts on Easter Wreath Ideas

Easter wreath ideas do not need to be elaborate to feel beautiful. A simple arrangement of greenery and blooms can quietly welcome spring and reflect the hope of the season.

Whether you choose florals, rustic textures, faith-inspired symbols, or minimalist greenery, let your wreath feel like an extension of your home — peaceful, intentional, and full of life.

Save it for later…

Homemaking, Homemaking Lifestyle

Easter Basket Ideas for Toddlers: Simple, Sweet, and Meaningful Options

Mar 10, 2026 · Leave a Comment

Creating Easter basket ideas for toddlers is one of the sweetest parts of preparing for Easter morning. At this age, it truly is not about how much you give, but how thoughtfully you choose.

Toddlers delight in simple things. A bright book, a soft bunny, a snack tucked into colorful paper — these small gestures feel magical to them. With a little intention, you can build a basket that celebrates the joy of Easter without cluttering your home or overwhelming your child.

Here are practical and meaningful Easter basket ideas for toddlers that are age-appropriate, useful, and full of charm.

Keep Toddler Easter Baskets Simple

Before choosing items, remind yourself: toddlers do not need much.

Three to five small gifts are more than enough. At this stage, the experience of discovering the basket is more exciting than the contents themselves. Keeping it simple helps maintain the peace of your home while still creating a special memory.

Faith-Based Easter Basket Ideas for Toddlers

If your family celebrates the spiritual meaning of Easter, including one faith-centered item is a beautiful tradition.

Board Book Bible Stories
Look for sturdy board books about the resurrection or simple Bible stories written for toddlers. These can become part of your yearly Easter reading.

Soft Plush Lamb
A stuffed lamb gently symbolizes the season and often becomes a treasured companion.

Simple Scripture Cards
Illustrated scripture cards with bright pictures can be displayed in a toddler’s room after Easter morning.

Practical Easter Basket Ideas for Toddlers

Toddlers grow quickly and constantly need new basics. Easter is a lovely time to gift something they will truly use.

Spring Pajamas
Lightweight pajamas in cheerful colors make a sweet and practical addition.

Sippy Cups or Snack Containers
Choose ones in spring colors or with fun designs.

New Socks or Sandals
Practical, yes — but to a toddler, something new feels special.

Bath Toys
A small rubber duck, stacking cups, or a gentle bath book can make bath time more enjoyable.

Fun and Playful Easter Basket Ideas for Toddlers

Toddlers thrive on hands-on exploration. Choose items that encourage movement and creativity.

Sidewalk Chalk
Perfect for warmer weather and outdoor play.

Bubbles
Simple, inexpensive, and endlessly delightful.

Chunky Crayons
Large, easy-to-grip crayons with a small coloring pad.

Wooden Puzzles
Simple peg puzzles help build coordination and focus.

Play Dough
Soft, toddler-safe dough in spring colors offers sensory fun.

Toddler-Friendly Easter Treats

While candy is often part of Easter baskets, toddlers do not need much sugar.

Fruit Snacks or Yogurt Melts
Age-appropriate and easy to portion.

Homemade Muffins or Mini Cookies
A small homemade treat feels special without overdoing it.

Dark Chocolate Bunny (Small Size)
If your toddler is old enough, a small chocolate bunny can be a simple tradition.

Balance is key. A little sweetness goes a long way at this age.

Choosing the Right Easter Basket

You do not need to buy a new basket each year.

Woven Baskets
Classic and reusable year after year.

Fabric Bins
Soft and practical for toy storage later.

Small Wooden Crates
Charming and sturdy, perfect for reuse in the playroom.

You can even use a toddler’s sand bucket or small tote bag for a playful touch.

Frugal Easter Basket Tips for Toddlers

If you are working within a budget, remember that toddlers do not measure value by price.

  • Reuse last year’s basket.
  • Split multi-pack items between siblings.
  • Bake something homemade instead of buying packaged treats.
  • Choose one main gift and fill the rest with simple basics.

The excitement in their eyes on Easter morning comes from the experience, not the expense.

As an Amazon Associate, I earn from qualifying purchases. This means if you click on one of my affiliate links and make a purchase, I may receive a small commission at no additional cost to you. I only recommend products that I personally use, love, or believe will be helpful to my readers.

Final Thoughts on Easter Basket Ideas for Toddlers

Easter basket ideas for toddlers should feel light, joyful, and manageable. This season is about celebration, family, and creating gentle traditions that your children will grow up remembering.

A small basket filled with thoughtful items — a book, a soft toy, a practical piece of clothing, and a tiny treat — is more than enough.

Simple truly is beautiful at this age.

Save it for later…


Homemaking, Homemaking Lifestyle

Easter Basket Ideas: Simple, Meaningful Gifts for a Easter Morning

Mar 10, 2026 · Leave a Comment

If you’re looking for Easter basket ideas that are thoughtful, simple, and meaningful, you’re not alone. Many families want to celebrate Easter in a way that feels joyful without being excessive. A beautiful basket does not have to be overflowing with candy to feel special.

With a little intention, you can create Easter baskets that reflect the hope of the season, celebrate spring, and delight your family in a lasting way.

Here are Easter basket ideas for children, babies, teens, and even husbands that keep things practical and purposeful.

Meaningful Easter Basket Ideas for Children

When building an Easter basket for children, consider including items that are both joyful and useful. A few intentional gifts often feel more special than a basket overflowing with candy.

Faith-Based Books
A beautifully illustrated children’s Bible storybook or a simple book about the resurrection helps center Easter on its true meaning. Choose age-appropriate versions that can become part of your family’s yearly tradition.

Spring-Themed Books
Picture books about…

  • spring
  • baby animals
  • gardening

…or new beginnings fit naturally into the season and can be enjoyed long after Easter Sunday.

Art Supplies

  • New crayons
  • watercolor paints
  • coloring books
  • a sketch pad

These are practical gifts that support your daily rhythm at home.

Outdoor Toys

  • bubbles
  • sidewalk chalk
  • jump ropes
  • a small ball

These simple gifts celebrate the arrival of spring and invite children outside as the weather warms.

Handmade Treats
Instead of excessive packaged candy, consider…

  • homemade cookies
  • muffins
  • homemade chocolate

A few quality sweets feel special without overwhelming little bodies.

Easter Gift Ideas for Babies and Toddlers

For little ones, Easter baskets can remain beautifully simple.

Board Books
Sturdy board books about springtime or Bible stories make sweet keepsakes.

Soft Toys
A small stuffed lamb or bunny can become a cherished comfort item.

Teething Toys or Practical Items

  • Pacifier clips – Girls or boys
  • baby spoons
  • a lightweight spring outfit like this cute dress or this adorable bow tie and suspenders outfit

…can all fit into a basket while still being useful. At this age, the joy is in the experience, not the quantity.

Easter Gift Ideas for Teens

Teen Easter baskets can feel tricky, but thoughtful simplicity works here too.

Devotionals or Journals
A devotional book or a beautiful journal encourages reflection and growth.

Quality Chocolate
A favorite gourmet chocolate bar or homemade treat feels intentional.

Gift Cards with a Personal Note
A small gift card to a favorite coffee shop or bookstore paired with a handwritten note makes it meaningful rather than transactional.

Spring Accessories
A new book, a lightweight scarf, or a practical accessory they have been needing fits nicely into a basket.

Easter Gift Ideas for Your Husband

Easter gifts are not just for children. A small, thoughtful gift can make the day feel special for your husband as well.

Favorite Snacks
Include his favorite treats or a special breakfast item.

A New Book
A theology book, devotional, or hobby-related book can be a thoughtful surprise.

Practical Items
A new pair of work gloves, grilling tools, or coffee beans he loves are simple but meaningful.

A Handwritten Letter
Never underestimate the power of a sincere note expressing gratitude and love.

How to Create a Simple and Beautiful Easter Basket

Choose a Reusable Basket
A woven basket, wooden crate, or fabric bin can be used year after year.

Keep It Simple
Three to five thoughtful items are more than enough.

Add Natural Touches
Use greenery, ribbon, or a linen napkin instead of plastic filler.

Focus on Meaning
Let at least one item in each basket point to the true celebration of Easter.

Frugal Easter Basket Ideas

If you are working within a budget, remember that simplicity is beautiful.

Reuse baskets from previous years.
Bake homemade treats.
Choose one special gift and keep the rest minimal.
Shop sales early or set aside items throughout the year.

Children remember traditions, warmth, and time together far more than the size of the basket.

Final Thoughts on Easter Basket Ideas

Easter basket ideas do not need to be extravagant to feel joyful. When you choose gifts intentionally, your baskets can reflect both celebration and meaning.

A simple collection of thoughtful items, presented with love, can make Easter morning feel peaceful, special, and full of hope.

Save it for later…

Homemaking, Homemaking Lifestyle

  • « Go to Previous Page
  • Go to page 1
  • Go to page 2
  • Go to page 3
  • Go to page 4
  • Interim pages omitted …
  • Go to page 11
  • Go to Next Page »

Primary Sidebar

New Posts

Whipped Cream Recipe

Homemade whipped cream is one of those simple touches that can elevate even the most basic dessert. Light, airy, it comes together in minutes and tastes far better than anything store-bought. Whether you’re topping fresh berries, pies, or a cup of coffee, this classic recipe is a staple worth keeping on hand. Prep Time: 5 minutesTotal…

Read On →

Cucumber Sandwiches

Cucumber sandwiches are a simple, refreshing option that feels both light and timeless. With a creamy, savory filling and crisp cucumber, they’re perfect for warm days, quick lunches, or a charming addition to a simple gathering. This easy recipe comes together in minutes using pantry staples, making it a lovely go-to when you want something…

Read On →

A Simple Summer Routine for Homemakers

Summer is a season that invites warmth, sunshine, and a slower pace in the home. For homemakers, it’s the perfect opportunity to simplify daily routines while still keeping the household organized, welcoming, and peaceful. A simple summer routine allows you to enjoy long, sunny days, spend more time outdoors, and embrace the small joys of everyday life…

Read On →

Simple Summer Homemaking Rhythms

Summer is a season that invites warmth, light, and a slower pace in the home. The long days and sunny afternoons make it the perfect time to enjoy simple routines that keep the household running smoothly without feeling overwhelming. By establishing simple summer homemaking rhythms, you can maintain a clean, organized, and welcoming home while still…

Read On →

How to Make a Pillow Cover

Want to make a simple pillow cover? Here’s a pattern for a DIY pillow cover that has a simple border around it. If you are looking to sew a pillow cover for any size pillow then this is for you. This is a basic pattern that is made to fit any throw pillow that you…

Read On →

How to Create a Spring Homemaking Binder

Spring is a natural time to refresh not only your home but also your homemaking systems. As the weather warms and the days grow longer, many homemakers feel motivated to clean, organize, and prepare their homes for a new season. One simple way to stay organized during this busy time is by creating a spring…

Read On →

Old-Fashioned Homemaker’s Spring Checklist

Spring has long been a season of renewal in the home. As the days grow longer and the weather begins to warm, many homemakers feel the natural desire to refresh routines, enjoy lighter meals, and bring a little beauty indoors. An old-fashioned spring checklist doesn’t have to be complicated. Instead, it focuses on simple, meaningful…

Read On →

Sourdough Discard Naan

Sourdough discard naan is a simple and delicious way to use up extra sourdough starter. These soft, fluffy flatbreads cook quickly in a skillet and have a light tangy flavor from the discard. They’re perfect for serving alongside your favorite meals, dipping into sauces, or using as an easy wrap for lunch or dinner. Ingredients…

Read On →

  • About
  • Homemaking
  • Healthy Living
  • Free Resource Library
  • Home

Copyright © 2026 The Virtuous Home on the Seasoned Pro Theme